March 20, 2021

New Adventure

For 13 years we lived on a small farm in rural Clark County, Washington.  This blog chronicles the adventures raising sheep, chickens, pigs and turkeys.  Grown veggies and fruit.  Battling the elements.  My daughter grew up on the farm.  She was 2 1/2 when we moved to the farm and 16 when we left.  Many joys, many tears.

In 2017, I made a mental list of everything that needed to be done.  The farm house needed new siding, new windows, new gutters.  It was overwhelming.  At the time my daughter was a competitive swimmer, so we worked all day, drove home to get her, drove back to Portland for swim practice and then back home. It was 5 hours of driving per day and not getting home to stay until after 9pm.  There was no time to manage the farm.  It was not enjoyable and not sustainable.

We made a huge change.  We sold the farm and moved into a suburban house on a small suburban lot in town.  The house was relatively new and needed zero repairs.  The yard was tiny by comparison - 20 minutes to mow instead of half a day.  And we were a 5 minute drive from the high school.  It was very, very hard to leave the farm, but the right decision.

What made it easier was that we also had a cabin on 6 acres in Packwood, Washington.  We could escape the town and neighbors for mountains and forests.  For almost 3 years we spent week days in Battle Ground, working Portland, and weekends in Packwood.  Then COVID hit.

On March 13, 2020 I came home from the office and I didn't go back.  Jeremy and I started working from the dining room table.  A
n idea took hold.  If we can work 100% remotely, why not do it from our cabin in the woods?  In June 2020, one week after Jordan graduated high school, we moved.  Next adventure!

April 13, 2020

Homemade Doggy Chow


My pup recently ate a 200 mg Ibuprofen. She only weighs 15 lbs! We had an emergency trip to the vet for induced vomiting followed by activate charcoal. She is doing fine but her tummy is still woozy.

I'm not a vet and I don't play one on TV. But I did do a bunch of highly reliable internet research before making a homemade dog food.  Here is the recipe.

Chicken and Veggie Loaf Dog Food
1 lb ground chicken
1/2 cup frozen peas and carrots
1/2 cup rolled oats
1/2 cup cooked rice
1 egg
Veggie oil

Pre heat oven to 350 F. In a bowl mix chicken, veggies, oats, rice and egg. Oil a bread pan then fill with chicken mixture. Press down.  Bake 40 minutes. Allow to cool then cut into single servings. Store in Tupperware in fridge for 3 days or freeze.

You can use ground turkey instead of chicken and any veggies your dog likes - green beans or spinach are good.


January 25, 2020

Container Gardening


I have always had a garden, or at the very least a tomato plant in the landscaping strip outside my apartment in college.  The garden at the hobby farm was the best garden though!  I was huge and fertile and produce plenty of food for our family.

When we chose to move off the farm (for multiple reasons including the state a repairs needed on the farm house), we moved into a small suburban house on a small suburban.  To complicate it further, we chose a house next to a protected wetland.  Perfect for some semblance of privacy in a neighborhood.  But I'm certain my yard is actually still part of the wetland.  The soils are sloppy wet in the winter.  If left to it's own devises, I'm sure sedges would return.  There really isn't a way to remove the grass and make a garden without spending a crazy amount on drainage and soil amendments. Therefore, containers.

The yard is also very small and has three large trees, so sunlight is limited to two areas against the house.  Therefore, small containers.

I've never done much container gardening other than flowers.  Certainly never things like pumpkins.  But I was determined to still garden.  Here is what I learned.

First, choose plants that will climb up a trellis.  But choose small versions.  For example, sugar pumpkins will work but jack-o-lanterns will not.  Along with sugar pumpkins, I chose butternut squash, cucumbers, sugar peas and green beans. 

Second, plants growing up a trellis will create a shaded space under where you can grow leaf lettuce, spinach or kale.  Just make sure to give each trellis plant plenty of space for their roots.

Third, other plants that do well in containers are tomatoes, peppers (but keep tomato plants and pepper plants far away from each other - they are not friends), small-variety carrots, green onions, beets, basil and chives.  I did all of these.

Forth, you need to prune and thin aggressively but reasonably.  Make sure everything has enough room to grow.  For the climbing plants, as soon as they start to put on fruit, trim the vines that want to keep growing up and out.

Finally, water.  These small containers have a lot sides that heat up and they can't get more water from surrounding soil.  You have to water daily.  But you also need good drainage on the bottom of the containers so the roots never have to sit in pooled water.  I hand watered every day in the mornings before it got hot.  But you could use a drip irrigation system on a timer to water at 4am (the best time to water gardens).

My containers did good the first year. I will add some new soil and compost for next season.

These are the containers freshly planted.  You can see the open containers between each trellis.  These were for the leafy greens that would prefer some shade created by the over hanging plants.  On the far right, I decided to remove the trellis and do carrots instead.

Right to left - sugar peas, cherry tomatoes and two roma tomatoes. This spot against the house got lots of sun and heat and the tomatoes did great!!!!

This is my favorite carrot of the season - two lovers.  I did a very small variety carrot and got a bumper crop.  We ate them raw, so sweet.

We got four sugar pumpkins and three butternut squash.  I baked the pumpkins and froze the pulp for pies.  In the back ground is a delicata squash and applies - no from my containers.


Quilting

While we are between farming adventures, I've had little share in our blog.  I hope that will change soon, as we are expecting to move in the next 6 months.  Until then, we are living in a small suburban house and yard.  I did recently complete a project that is more homesteading-like.

Backstory ... I love to sew.  When Jordan was young, I made lots of clothes for her.  As she got older, she didn't want homemade clothes other than jammies.  I did save all scraps from her toddler years.

Over Christmas Break, my friend was finishing up two "tie quilts" for her kids (in their 20's).  These quilts were made from scraps of jeans and a used comforter.  Jeanine and I spent hours using yarn to tie the jean quilt top she made to the comforter.  The quilts turned out very cute.  And I was inspired.

Add to the inspiration the fact that Jeremy handed me a stack of old jeans with big, non-repairable holes.

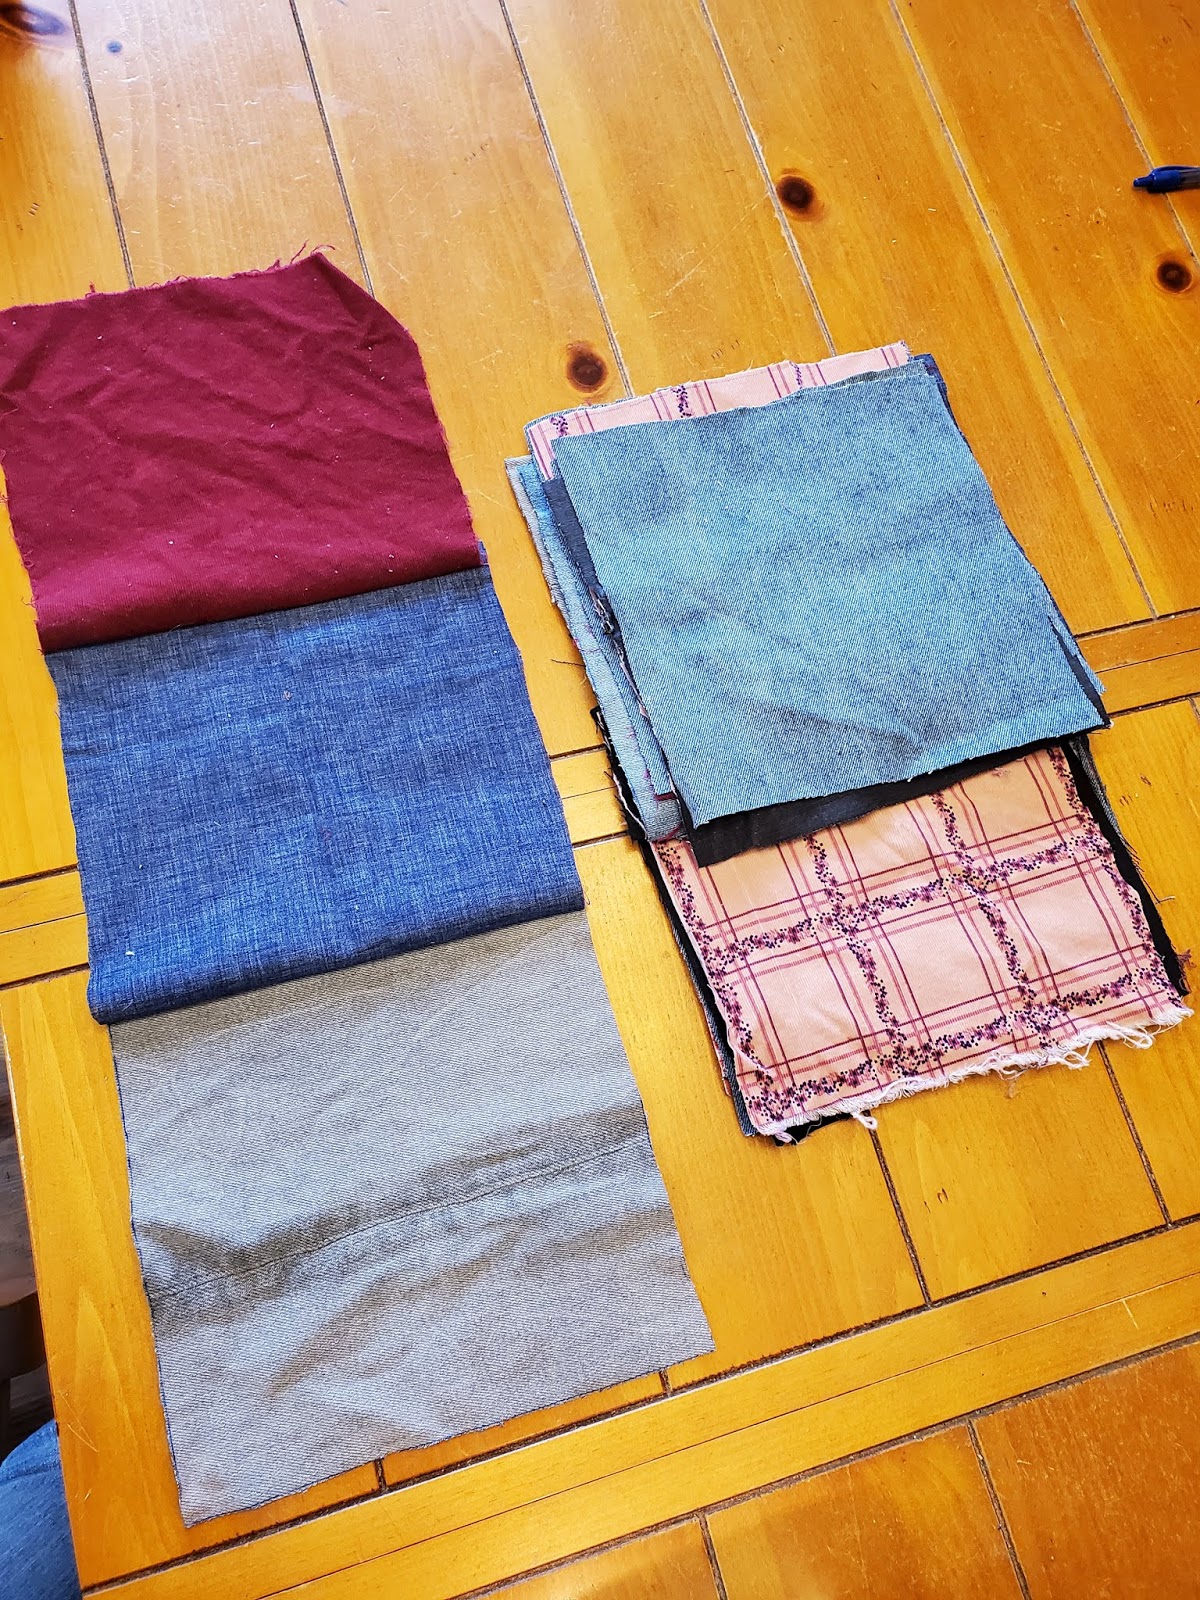
The first weekend after Christmas break, Jeremy cut 144 9" squares of old jeans and fabric scraps.  I contributed old jeans and so did Jordan.  Then I proceeded to make the quilt.

Steps:
1. Math.  A standard queen sized quilt is 92" x 96".  If the finished squares are 8" then I need 12 across to have a width of 96".  And if I did 1/2" seams on all sides of the squares, then I needed to start with 9" squares.

2. Pick your fabric.  I have lots of scraps.  But I wanted to have a matching theme of colors.  Apparently I made a lot of pink items of clothing for Jordan, so pink it was.  Make sure everything is washed and dried.

3. Cutting.  Jeremy made a pattern out of heavy cardboard that measured 9" by 9".  He used a black pen to draw the squares on the fabric.  For the jeans, you can include the back pockets as long as there is at least 1" of fabric all the way around the pocket to stitch.  Try to avoid the thick inner seams - Jeremy just cut those out to begin with - but the thinner outer seams are OK.

4.  Sewing the squares.  You can make a pattern out of the squares or, as I did, you can be random.  Stitch each square together, with 1/2" seams, to create a long row with 12 squares.  Be sure to iron each seam open.

5. Layout the top.  Once you have 12 long pieces of 12 squares each, lay out your work and adjust the rows.  I wanted not two accent colors to touch and I wanted the pocket squares to be evenly distributed.  Jordan helped.  Once you have it, pick up the rows from the top to the bottom so you know the order you will stitch in.

5 1/2.  Patch and sign.  Once you know the top and bottom, add a patch to the bottom corner square with the date and your name.  Use a fabric marker.  You can add a note too.  Make it personal.

6.  Finish the top.  Sew each row together with 1/2" seams.  Make sure to iron all seams open.  Keep going until you have a 96" by 96" square quilt top.  Lay it out and marvel at your work!!!

7. Pick out backing.  You could have done this early too, but I waited.  I chose a really soft microfleece with pink, gray and black (we had gray and black jeans in the mix).  The math is hard.  You had to convert inches to yards to inches.  It would help if every bolt had the same width, but no.  I admit I did not get it right and had to go back for another yard-and-a-half of backing.  I wanted to leave myself 6" spare on each side to work with.  I had to sew three pieces of backing together in the end.  Wash and dry your backing fabric before you start working it.

8. Get the quilting liner.  I chose one with a single fusible side and something pretty thick.  In retrospect I wish I had gone thinner because it takes forever for the finished quilt to dry.  But she will always be warm!  The math is tricky here too.  I did manage to do it right the first time, thankfully.

9. Fuse liner to quilt front.  This takes FOREVER! Put on a good movie and set up the ironing board in front of the TV.  You want to do this step to make sure all of the seams are open and will stay open.

10. Stitch backing.  Layout your backing fabric, cut big panels to make a 108" by 108" square.  Stitch the panels together.  My backing was plaid, so I also had to line up lines.  The plaids do hide any small mistakes you make though (and I made plenty).

11.  Pin top/liner to back.  You need a huge space to work on.  I cleared out my dinning room and worked on the wood floor. I laid the backing down and put the top/liner on it.  Smoothed and smoothed out everything, then started pinning.  I worked from the center to the corners.  I did not pin all rows/squares, but I did pin a lot to keep the fabric from bunching.

12.  Sew diagonal.  Working from the center, sew diagonal across each square to the far corners.  This is a really hard part because you are working with so much fabric.  I rolled up the side to make it easier, but it was heavy and difficult.  My arms were sore and tired by the end.  Once you have a big cross sewn from the center to each corner, start working the next diagonal.  I did full lines from one edge to the other out to the corner and then rotated the whole quilt.  I worked well, but it was hard.  I did have some bunching of the microfleece but you have to look closely to see it.

13.  Cut edges for finishing.  I wanted a 1" edge, so I cut just slightly over 2" around the whole quilt.

14.  Pin the edges.  For this step, use every pin you can.  Fold once to the edge of the top, then fold over the top and pin.  I was working on the dining room floor again - the wood floor was perfect although my butt hurt afterwards from sitting on the floor for an hour.  The corners are tricky.  I didn't do a great corner - you may want to google some options.  I pinned every 3" to make sure the edges looked good and had no bunching.

15.  Sew the edges.  Sew the inner edge of the folded over backing.  Sew as close to the edge as you can.  All the way around.  I crossed my corners with stitching.  Again, my corners aren't great and I'm sure there are better/cleaner ways to do it.

After having done this I can say, I will NEVER make a queen-sized quilt again.  That amount of fabric is crazy difficult to work with.  I could have made it easier with a thinner lining, but it would have still been a challenge to manage through the sewing machine.  Other than the size, it was easy if time consuming.  If I make a quilt again, it will be a twin-sized or smaller or a picnic blanket.

October 29, 2016

Saying Good bye

We had to say good bye to a friend today.

Junior and his brother Buddy were the first two animals we brought to the farm.  We moved here 2005.  The farm was owned by a family who ran horses in the pastures.  We spent the first year moving fences, reseeding the pastures and prepping for animals.  Then in the spring of 2006 we found a couple of rams for sale at a near-by farm.  The brothers were under a year old and sweet animals.  The owners brought them to our farm in the back of a Subaru hatchback with a sheet thrown down.

As they grew they battled with each other.  Some times we would come home to find one or both bloody from ramming.  Buddy also was very aggressive with us. So when it was time to choose which to keep and breed with, we chose Junior.

Shortly after that, Jeremy's Grandpa called and asked us if we could take a bummer calf that had been bottle fed by the neighbor girl and now would not go out to the pasture.  Gladys moved in with Junior and became fast friends.  They would head butt too.  However, Gladys grew quickly and got very big.  Junior quick trying to play with her when she got fed up being rammed, put her head under his belly and threw him.

Junior was a loving soul.  His warm eyes were always gentle and playful.  But he was strong and had no idea that he could do damage.  If you hopped the fence to see him and you weren't ready he would knock you to the ground.  One afternoon, our neighbor Lola came over with a cast on her arm.  She was asked by another neighbor who was having their tree pruned if she could move Junior so they could clean up the branches.  We weren't home and Lola thought since Junior was so sweet, that she could move him by tempting him with some oats.  When she opened the gate, he thought she was there to play and rammed her.  She fell over, realizing she should not be trying to move him. As she got up and turned to leave, he rammed her again and broke her arm.  She was embarrassed when she came over to tell me because, as she said "I know better than going in with a ram."

But with a fence separating you from him, Junior was a lover.  He would come a-running when he saw anyone coming.  He would run down to the road to greet walkers and kids on bikes.  He loved getting his nose rubbed and the treats people brought.  Junior was almost famous in our little area.

He was also loud.  When you opened the front door, he heard it and would call out for oats or hay.  Is call was short and loud - BA!  I remember when a friend of mine came to visit.  She was from Seattle and not a farm-type person.  She arrived at night, pulled up and got out.  I heard Junior call to her.  I opened the door and she said "What the hell was that?!"  "That's our boy Junior."

About a year ago Junior feet started giving him trouble.  We treated for hoof-rot, but he never showed any symptoms of hoof-rot.  We trimmed and trimmed his hooves.  But nothing worked.  Then his knees started to swell with arthritis.  We treated that with aspirin and molasses.  Finally he was too sore to go out and graze.  We moved him from his pasture to the pig pen (we didn't raise pigs this year).  That way we could easily feed him and he could be next to the ewes.  Notag, our matriarch ewe, would lay against the fence and him on the other side.

For a while, he stayed the same, but the past week or so he stopped getting up to eat, even when we were serving oats.  He lost a lot of weight.  So we called Dr. Scott.

Tonight, Jeremy, Jordan and I all sat petting his nose and telling him we love him as he passed away.  We buried him under his favorite tree in his pasture.  We will miss him dearly.

Junior with Jordan when he first came to the farm.
Playing in the snow.
This is how I will remember him the most - getting some love through the fence.

Our handsome boy.